Kitchen Organization Essentials: Snack Station Setup for Back-to-School — Quick Wins

End the after-school scavenger hunt with simple, visible snack spots the whole family can use—no reminders required.
We focused on organizers that are easy to see into, adjust, and place without tools. Each item supports a specific station: drinks, dry mix-ins, serving pieces, and planning. Materials and formats are straightforward—acrylic for visibility, wood for divided sections, and racks/shelves that fit typical cabinets or fridge spaces. We prioritized items that work in small or large kitchens and can shift as routines change.
Snack Station Setup with Kitchen Organization Essentials
End-of-summer routines are shifting, which makes this the perfect moment to build a reliable snack station. Using a few Kitchen Organization Essentials, you can create clear grab-and-go zones that make after-school and work-from-home nibbling straightforward. The goal: keep favorites visible, within reach, and grouped by task so anyone can pack a lunchbox or grab an afternoon bite without rummaging.
Start by choosing one cabinet shelf for dry snacks and one section in the fridge for perishable items and drinks. Add a simple labeling method—words or icons—so kids and teens can help themselves. Keep serving pieces (small bowls, cups, napkins) nearby to minimize back-and-forth. For back-to-school, think in terms of “stations”: a drink lane, a mix-in caddy, a quick-heat zone, and a prep surface. Each zone gets its own container or organizer so things land where they belong after restocking. The result is a rhythm you can reset in minutes after a grocery run.
Below are streamlined picks and a step-by-step routine to help you build a snack setup that fits your space, whether you’ve got a galley kitchen or a generous pantry.
10-Minute Reset
Choose two home bases
Designate one cabinet shelf for dry snacks and one fridge section for perishables. Keep them shoulder-to-eye level for easy visibility. If counter space allows, set a small tray nearby for fruit and clean napkins, so the whole setup reads as one connected zone.
Set a drink lane
Reserve one fridge shelf or side for cans and small bottles. Use an organizer that moves the next drink forward as one is taken, so the front always stays stocked. Place reusable cups beside it to streamline pouring and keep condensation drips in one area.
Create a mix-in caddy
Use a divided box for tea bags, cocoa packets, oatmeal sachets, or electrolyte sticks. Six compartments make it easy to separate flavors and keep morning and afternoon options in one spot. Place spoons and a small bowl of stirrers next to the caddy.
Build vertical space in cabinets
Add a two-tier shelf to convert one cabinet into zones: bowls and cups above, snacks and small bins below. This separates serving pieces from food, so kids can grab what they need without shifting stacks of dishes.
File trays and lunch gear
Stand up sheet pans, lunchboxes, and lids in an adjustable rack. Filing them spine-out keeps everything visible and makes packing or reheating straightforward. Keep the rack near the microwave or toaster oven if possible to cut steps during busy afternoons.
Plan and restock once a week
Use a magnetic weekly board to list snack choices and note what to restock. Add a quick weekend reset: wipe shelves, wash cups and containers, and put new items front and center. Consistency keeps the station useful as school schedules ramp up.
How We Picked the Pieces
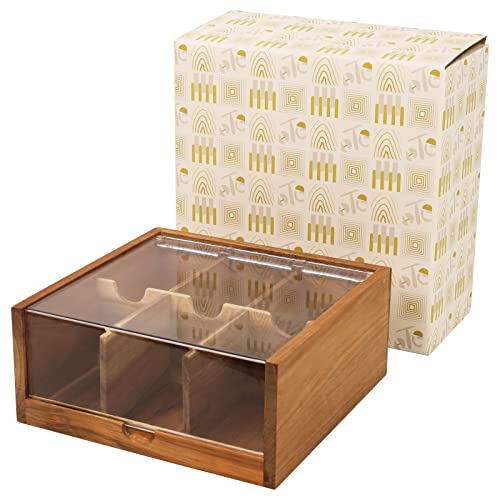
Acacia Wood Tea Bag Organizer with Lid
Acacia Wood Tea Bag Organizer with Lid: A tidy home for tea, cocoa, oatmeal packets, and drink mix sticks. The clear lid shows what’s inside at a glance, and six compartments keep flavors separated for quick pick-and-go moments.
- Sort by time of day or flavor.
- Keep spoons and napkins beside it.
- Use one section for refill packets.

Two-Tier Cabinet Shelf
Two-Tier Cabinet Shelf: Turn a single cabinet into two usable levels for bowls, cups, and snack bins. This expandable, tool-free shelf fits most cabinets and creates a defined serving zone above a snack zone.
- Place cups up, snacks down.
- Reserve back row for backups.
- Slide in
- adjust to fit width.

Adjustable Fridge Drink Organizer:
Adjustable Fridge Drink Organizer: A spring-loaded design keeps cans moving forward so the next drink is ready. It holds about 4–5 drinks per row, keeping the snack lane neat and reducing shuffle in a busy fridge.
- Dedicate one row per person.
- Front-load tomorrow’s lunch drinks.
- Place near reusable cups.

Toplife Pot and Lid Organizer Rack
Toplife Pot and Lid Organizer Rack: File sheet pans, cutting boards, lunchboxes, and lids so after-school prep is simple. The adjustable dividers hold a variety of sizes, turning a jumble into easy-to-grab slots.
- Stand pans vertically by size.
- Reserve a slot for lunch kits.
- Keep near toaster or microwave.

Acrylic Straw Holder
Acrylic Straw Holder: Separate compartments keep straws organized for smoothies, water bottles, or juice pouches. Clear walls make counts easy, and mounting options let you place it on a wall or inside a cabinet door.
- Sort by straw type or length.
- Label with simple icons.
- Store cleaning brushes nearby.

Magnetic Dry Erase Board
Magnetic Dry Erase Board: A fridge-friendly weekly planner that puts snack choices, practice nights, and grocery reminders in one visible place. It anchors your routine so the station gets updated on the same day each week.
- Color-code by person.
- List three rotating snack picks.
- Add a small ‘need soon’ column.
A calmer 4 p.m., powered by Kitchen Organization Essentials
As schedules fill back up, a clear snack lane, a simple mix-in caddy, and a weekly plan make afternoons smoother. With Kitchen Organization Essentials that are visible, adjustable, and easy to place, your family can find what they need and put it back. Set it once, then give it a quick weekly refresh.
FAQ: Real Questions Moms Google
Where should I put a snack station in a small kitchen?
Choose one cabinet at eye level for dry items and one fridge shelf for perishables. Keep both near where kids drop backpacks or where you prep lunches. Visibility matters: clear containers, simple labels, and consistent placement help everyone find things without moving stacks or opening multiple doors.
How do I label without visual clutter?
Use short category words—“Drinks,” “Mix-Ins,” “Bowls”—or simple icons. Place labels on the shelf edge or the front of a bin, not the lid. Keep fonts large and high-contrast. If you share the space, add initials or colors to segment items without adding extra containers.
How often should I reset or restock the station?
Plan a once-a-week reset tied to your grocery day. Wipe shelves, wash reusable cups, bring older items forward, and restock the front with current favorites. A brief midweek check—two minutes to move empties out and note refills on a planner—keeps the station ready during busy afternoons.
What can I store in the tea organizer besides tea?
Use compartments for cocoa packets, oatmeal sachets, electrolyte sticks, instant coffee, and small snack pouches. Group by use: morning, after-school, or sports. The clear lid helps you see levels quickly, so you can move low items to your restock list without opening every container.
Quick wins in your inbox.
One cozy email a week with mom-tested picks and tiny resets.
Related Posts

Kitchen Organization Essentials: A 10-Minute Morning Reset for Back-to-School — Quick Wins
A simple, 10-minute morning reset can clear your counters, corral kid gear, and keep breakfast moving. These Kitchen Organization Essentials help you glide from end-of-summer to back-to-school with calmer surfaces and grab-and-go zones that actually work on busy weekdays.
Read More
Kitchen Organization Essentials for Tiny Kitchens: Vertical Stackers That Actually Fit — Quick Wins
Tiny kitchen, big schedule? These Kitchen Organization Essentials lean on vertical stacking and slim profiles that actually fit, so you can glide into back-to-school season with clear counters, tidy cabinets, and a fridge that makes grab-and-go mornings easier.
Read More
Morning Reset Kitchen Organization Essentials: Quick Wins for Back-to-School Mornings: Morning Reset Kitchen Organization Essentials
Short on time and big on chaos? These Morning Reset Kitchen Organization Essentials help you streamline breakfast, pack lunches faster, and start the day calm—perfect for end-of-summer into back-to-school routines.
Read More